What is Bluefin OS?
Imagine if your computer was as reliable, secure, and maintenance-free as a Chromebook, but had the raw power and flexibility of a high-end developer desktop. That is Bluefin OS. Built on top of Fedora Silverblue, Bluefin is a next-generation Linux operating system designed for modern creators, developers, and gamers.
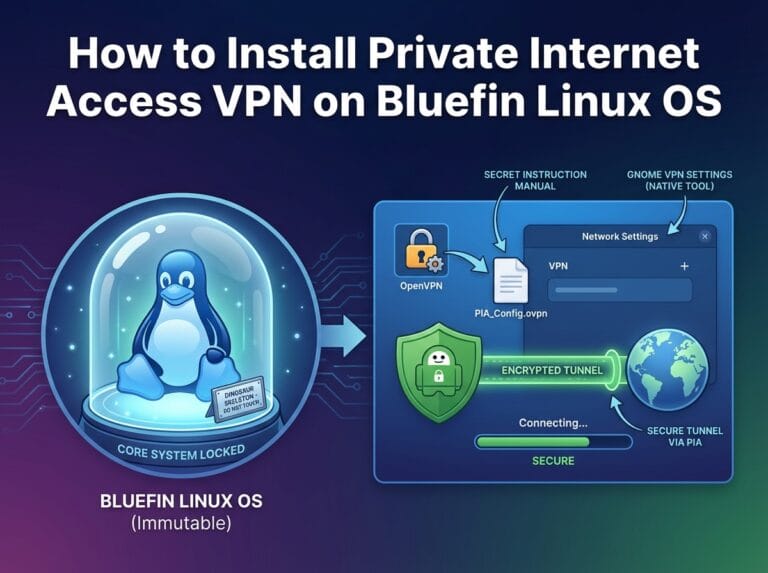
ELI5 (Explain Like I’m 5): Think of a traditional operating system like a giant sandbox where any app can dig a hole and accidentally bury your favorite toy. Bluefin OS is an “immutable” or “atomic” operating system. This means the core of the computer is locked in a glass display case. Apps can’t touch it or break it. If you restart your computer, the core is always exactly as the creators intended. You still get a sandbox for your personal files and games, but your computer will never mysteriously break down over time.
Chrome OS vs. Bluefin OS: Which is Better for Google Ecosystem Users?
Many users love Chromebooks because they plug seamlessly into the Google Ecosystem (Google Drive, Docs, Gmail). If you are heavily invested in Google, you might wonder if you should stick to Chrome OS or switch to Bluefin OS.
- Chrome OS Benefits: Chrome OS is built directly by Google. It natively runs Android applications and has Google Drive deeply baked into its file manager. It is incredibly lightweight, making it great for lower-end hardware, but it is a “walled garden.” You are restricted in what software you can install.
- Bluefin OS Benefits: Bluefin provides a feature called GNOME Online Accounts. By signing in once with your Google Account, your Google Drive seamlessly mounts in the Bluefin file manager, just like Chrome OS. You can also use Google web apps effortlessly. However, unlike Chrome OS, Bluefin gives you a full, unrestricted desktop environment. You can install PC games, professional video editors, and advanced coding tools.
The Verdict: If you strictly browse the web and use Android apps, Chrome OS is fine. If you want the Google ecosystem experience but also want to write code, play PC games, and truly own your machine, Bluefin OS is the superior choice.
How to Dual Boot Bluefin OS on a Desktop PC (Using a Separate Hard Drive)
Dual booting by installing a second operating system on a completely separate hard drive is the safest way to run two operating systems (like Windows and Bluefin). It prevents the two systems from fighting over the same boot files.
Prerequisites
- Your main desktop PC with its primary hard drive (e.g., running Windows).
- A completely separate, blank internal hard drive or SSD installed in your PC.
- A USB flash drive (at least 8GB).
- The Bluefin OS ISO file downloaded from the official website.
- A program like BalenaEtcher or Rufus to flash the ISO to the USB drive.
Step-by-Step Installation Guide
- Flash the USB: Open BalenaEtcher, select your Bluefin ISO, select your USB drive, and click “Flash”.
- Boot from USB: Restart your computer and press your motherboard’s boot menu key (usually F8, F11, or F12) repeatedly before the manufacturer logo appears. Select your USB drive from the list.
- Start the Installer: Once the Bluefin live environment loads, click on the “Install” icon on the desktop.
- Select the Correct Drive: When the installer asks where to install Bluefin, pay close attention. Select your secondary, blank hard drive. Do not select your primary Windows drive. Choose to erase the secondary drive and use the entire disk for Bluefin.
- Finish and Reboot: Let the installation finish, remove the USB drive, and restart your computer.
- Switching Between OSs: Whenever you turn on your PC, use your motherboard’s boot menu key (F8/F11/F12) to choose whether you want to boot from the Windows hard drive or the Bluefin hard drive.
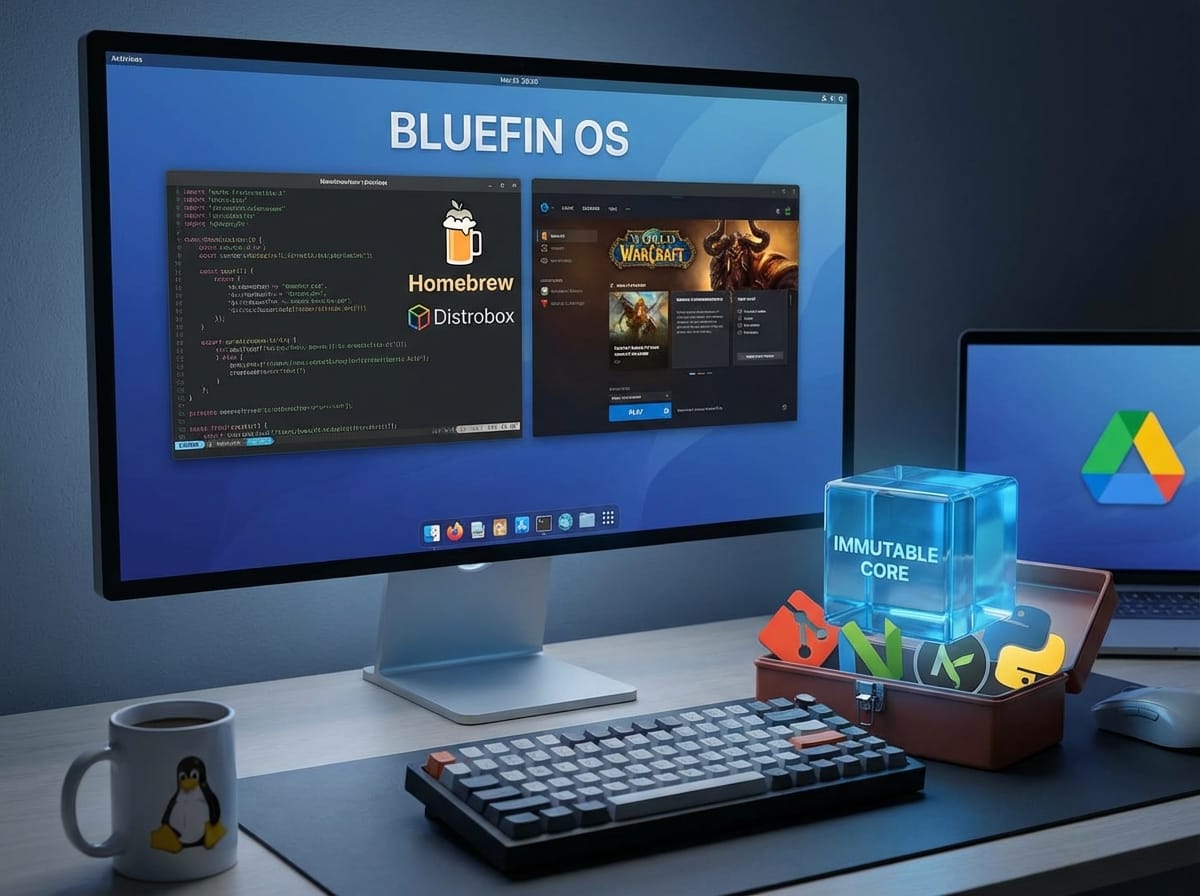
Unleashing the Power of Homebrew and Distrobox on Bluefin
Because Bluefin’s core is locked away (immutable) to keep it safe, you can’t install software the traditional, messy way. Instead, Bluefin uses two incredibly powerful tools: Homebrew and Distrobox.
What are Homebrew and Distrobox?
ELI5 – Homebrew: Imagine you have a workbench, but your landlord (the operating system) says you can’t nail anything to the walls. Homebrew is like a massive, self-contained toolbox. You can pull out thousands of professional tools (software) and use them on your desk without ever putting a hole in the landlord’s wall.
ELI5 – Distrobox: Imagine a magic door inside your bedroom. When you step through it, you are instantly inside a completely different house, but you are still carrying your own backpack. Distrobox lets you run completely different Linux operating systems (like Arch Linux or Ubuntu) inside a tiny, invisible container on Bluefin. It allows you to run software that was only meant for other systems.
Essential Homebrew Tools for the Host PC
Homebrew is perfect for command-line utilities and developer tools on your host PC. Here are the tools you should install via Homebrew on Bluefin:
- Git & GitHub CLI (gh): Essential for version control and managing your code repositories.
- Neovim or Micro: Fast, terminal-based text editors for quick code changes.
- Fast Node Manager (fnm) or Pyenv: For managing different versions of JavaScript/Node and Python without cluttering your system.
- FZF (Fuzzy Finder): A tool that makes searching for files in your terminal lightning fast.
- Eza: A modern, color-coded replacement for the traditional ‘ls’ command to view your files.
How File Sharing Works Between the Host PC and an Arch Linux Distrobox
One of the most confusing things for new users is understanding where their files go when using containers. Distrobox handles this brilliantly.
When you create an Arch Linux environment inside Distrobox, Distrobox automatically mounts (shares) your host PC’s Home directory (/home/yourusername) directly into the Arch Linux container.
Example: If you download an image to your “Downloads” folder while browsing the web on your Bluefin host, you can immediately open your Arch Linux terminal, type cd ~/Downloads, and the image will be sitting right there. They share the exact same file system. Any changes made to a file in Arch Linux happen in real-time on the Bluefin Host.
Using Homebrew Tools for GitHub Development
Because the file system is perfectly shared, Homebrew and Distrobox work together beautifully to help you write software for GitHub repositories.
- Clone the Code: You use your Homebrew-installed
gitcommand on the Bluefin host to clone a GitHub repository into your Documents folder. - Write the Code: You open your favorite code editor (installed via Homebrew or Flatpak on the host) and write a new feature for your software.
- Test the Code in Arch: The software you are writing requires a specific dependency only found in Arch Linux. You open your Arch Linux Distrobox terminal, navigate to the same folder, and compile/test the code safely. If the code crashes, it only crashes the Distrobox, not your host PC!
- Commit the Code: You switch back to your host terminal and use the Homebrew
gh(GitHub CLI) tool to push your finished code back to GitHub.
How to Play World of Warcraft on Bluefin OS
Bluefin isn’t just for developers; it is an incredible gaming platform. Because it shares the same underlying technologies as the Steam Deck, gaming on Linux is easier than ever. Here is how to get World of Warcraft running perfectly.
Setting Up Battle.net via Flatpak
Since WoW runs through the Battle.net launcher, we will use a compatibility layer called Wine/Proton to translate Windows game code into Linux code in real-time.
- Install Bottles or Lutris: Open the GNOME Software Center on Bluefin. Search for an app called Bottles (or Lutris) and install the Flatpak version. These apps are specifically designed to manage Windows games on Linux.
- Create a Gaming Environment: Open Bottles, click the “+” to create a new “Bottle.” Name it “Blizzard” and select “Gaming” as the environment type. Bottles will automatically configure the best translation layers (like DXVK and VKD3D).
- Download Battle.net: Go to the Blizzard website and download the Windows
.exeinstaller for Battle.net. - Run the Installer: Inside your “Blizzard” bottle, click “Run Executable” and select the Battle.net installer you just downloaded.
- Install WoW: Once Battle.net opens, simply log in, navigate to the World of Warcraft tab, and hit install. The game will download and run exactly as it does on a Windows machine!
ELI5 – Windows Compatibility: Think of World of Warcraft as someone who only speaks Spanish, and your Linux computer as someone who only speaks English. Apps like Bottles act as a real-time translator sitting between them, translating everything instantly so they can work together without any lag.