If you have just built an incredible Android app, you are probably ready to share it with the world. But before you hit “Publish” on the Google Play Console, you face a major hurdle: creating stunning, professional screenshots. You do not need to be a graphic designer or spend hours learning Photoshop to make this happen. In this guide, we will walk you through exactly how to use AppScreens.com to generate high-converting, beautiful posts and screenshots for your Google Play Store app.
Why Google Play Store Screenshots Matter
When a user lands on your app’s page in the Google Play Store, they make a decision to download (or leave) within a matter of seconds. Your screenshots are the most prominent visual element on that page. They act as your sales pitch, demonstrating what your app does and why the user needs it.
Explain Like I’m 5 (ELI5): Imagine your app is a brand-new action figure in a massive toy store. The code you wrote is the toy itself, but the screenshots are the shiny, colorful box it comes in. No matter how incredibly fun the toy is, if the box is wrapped in plain brown paper, no kid is going to ask their parents to buy it. Great screenshots are the shiny box that makes people want to open it.
What is AppScreens.com?
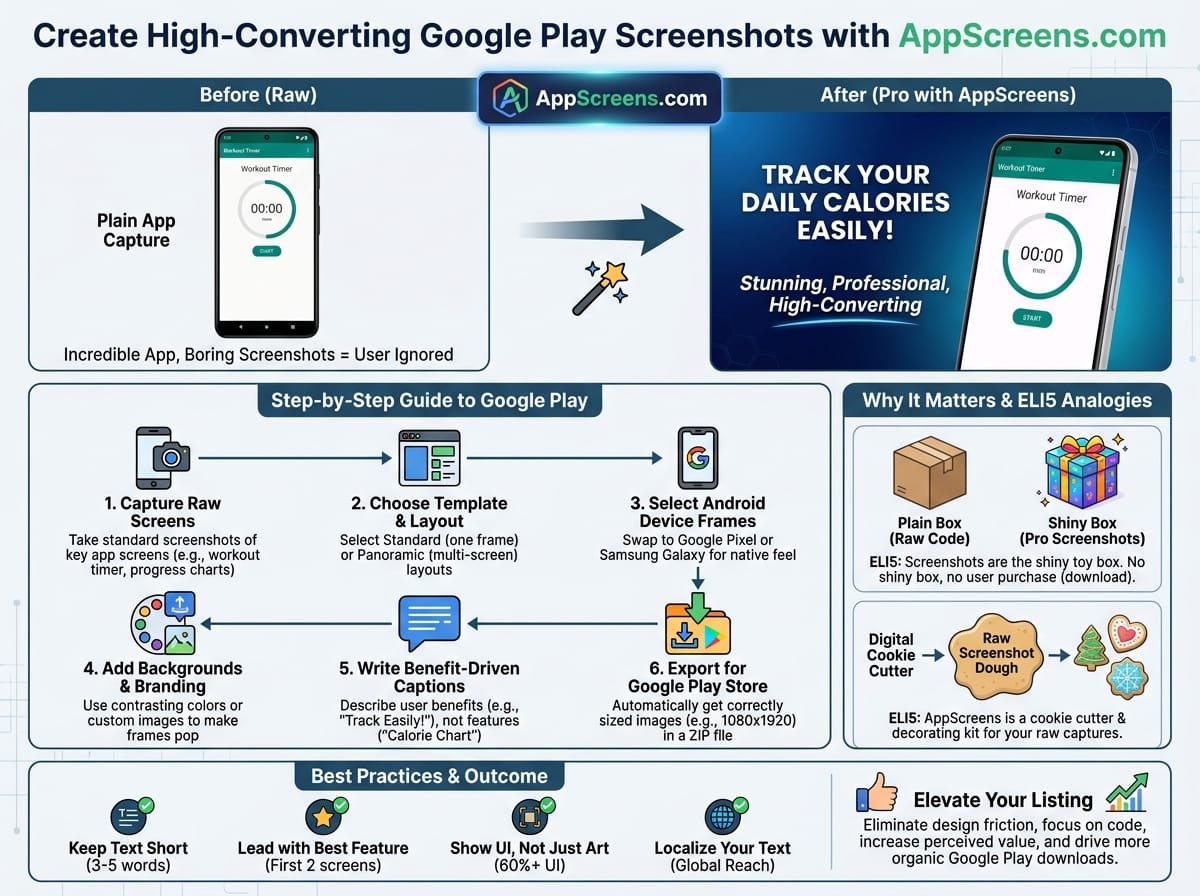
AppScreens.com is a web-based screenshot and mockup generator specifically designed for app developers. It allows you to take your plain, boring screenshots and wrap them in sleek 3D device frames, add custom backgrounds, and insert bold text to highlight your app’s best features.
Explain Like I’m 5 (ELI5): Think of AppScreens as a digital cookie cutter and decorating kit. You bring the plain dough (your raw app screenshots), and AppScreens gives you the shapes, icing, and sprinkles to make them look like professional bakery cookies.
Step-by-Step Guide: How to Use AppScreens.com for Google Play
Follow these exact steps to transform your raw app captures into a professional Google Play Store listing.
Step 1: Capture Your Raw Screenshots
Before you open AppScreens, you need the raw images of your app. Open your app on an Android device or an emulator (like Android Studio) and navigate to the most important screens. Take standard screenshots.
Example: If you created a fitness tracking app, take one screenshot of the workout timer, one of the user’s progress charts, and one of the workout summary screen.
Step 2: Choose Your Template and Layout
Once you create an account and log into AppScreens.com, create a new project. You will be greeted with a variety of layout options.
- Standard Layout: One device frame per image with text above or below.
- Panoramic Layout: A larger image that stretches across multiple screenshots (highly effective for storytelling).
For a Google Play Store listing, starting with a clean, standard layout is highly recommended so Android users can clearly see the interface.
Step 3: Select the Right Android Device Frames
Because you are generating images for the Google Play Store, it is crucial to use Android device frames. Users subconsciously look for interfaces that match their own phones.
In the AppScreens editor, navigate to the “Devices” tab. Swap out the default iPhone frames for Android models, such as a Google Pixel or a Samsung Galaxy. This makes your app feel native to the Google Play ecosystem.
Step 4: Add Backgrounds and Branding
Your screenshots should match your app’s brand identity. Under the “Backgrounds” tab, you can choose solid colors, gradients, or even upload custom background images.
Pro SEO & Branding Tip: Use a background color that heavily contrasts with your app’s interface. If your app uses a “Dark Mode” theme, use a bright, vibrant background (like electric blue or neon orange) so the device frame pops off the screen.
Step 5: Write Benefit-Driven Captions
AppScreens allows you to easily add text above or below your device frames. Do not just describe the feature; describe the benefit to the user.
Example:
- Bad text: “Calorie Chart Screen”
- Good text: “Track Your Daily Calories Easily!”
Step 6: Export for Google Play Store
Google Play has strict sizing requirements for app screenshots. The beauty of AppScreens.com is that it automatically calculates these dimensions for you.
When you are happy with your design, click the “Export” button. Select the Android / Google Play option. AppScreens will generate a ZIP file containing all your images perfectly sized (typically 1080 x 1920 pixels) and ready to be dragged and dropped directly into your Google Play Console.
Best Practices for High-Converting App Screenshots
To ensure your newly generated AppScreens perform well and help boost your App Store Optimization (ASO), keep these golden rules in mind:
- Keep Text Short: Mobile users swipe fast. Limit your captions to 3-5 words per screenshot. If they have to squint to read a paragraph, they will leave.
- Lead with Your Best Feature: Your first two screenshots are the most important because they are visible without the user having to scroll. Put your absolute best, most exciting features here.
- Show UI, Not Just Art: Users want to see what the app actually looks like. Make sure the device frame and your app interface take up at least 60% of the graphic.
- Localize Your Text: If you are targeting different countries, use AppScreens to generate multiple versions with translated text to increase global downloads.
Elevate Your Google Play Listing Today
Using AppScreens.com eliminates the friction of graphic design, allowing you to focus on what you do best: writing great code and building amazing apps. By utilizing the right Android device frames, adding benefit-driven text, and exporting to Google’s exact specifications, you will instantly increase your app’s perceived value and drive more organic downloads.